Quick Guide to installing SAS ODBC-driver for SAS SPD-server

Below is a step-by-step guide to install and configure an ODBC-driver for SAS SPD-server. Be aware, that this guide installs the 64-bit version of the ODBC-driver.

  1. Download SAS ODBC-drivers from the SAS-homepage. Do a search on the web to find the page.
  2. Unpack and install odbcdrvrweb__94180__wx6__xx__web__1.zip
    This should be done as administrator.
  3. Unpack and install spdsclibsweb__99150__wx6__xx__web__1.zip
    This should be done as administrator.
  4. It is the best option just to install these drivers as suggested by default during the installation process. If you deviate from this – you can face issues when setting up the connections in ODBC.
  5. Extract the file clientlibs_spds50_Windows_x86_64.zip in the directory C:\Program Files\SASHome\SASScalablePerformanceDataServer\5.4\lib into the same directory C:\Program Files\SASHome\SASScalablePerformanceDataServer\5.4\lib.
  6. Copy all the files from C:\Program Files\SASHome\SASScalablePerformanceDataServer\5.4\lib (excluding the clientlibs_spds50_Windows_x86_64.zip) into the directory C:\Program Files\SASHome\SASDriversforODBC\9.46

If this is to be used by SSIS, then you will need to create these as 32-bit ODBC-connections. SSIS it not able (as of November 2021) to easily handle 64-bit ODBC-connections.

Below example is for the SPDPROD SPD-server library on the SPDSERVER01 server

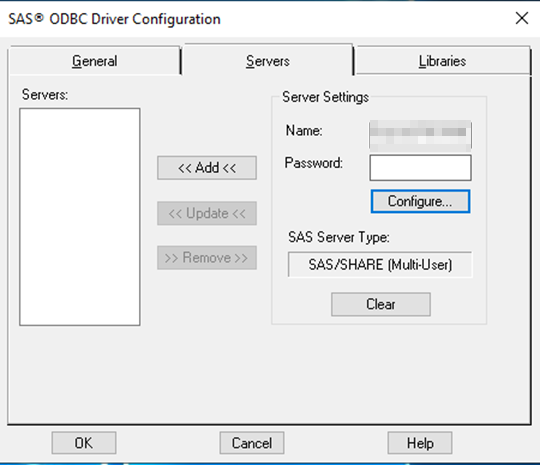
On the Server-tab

Name <SERVER NAME>.<PORT> e.g. SPDSERVER01.5180

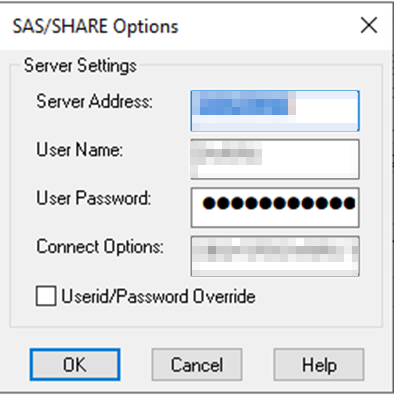
Press the Configure-button (in the dialog above)

Server Address <SERVER NAME> e.g. SPDSERVER01
User Name <I THINK THIS MUST BE THE USERNAME FOR USED FOR YOUR DBQ>
User Password < THE USER PASWWORD FOR USER USED ABOVE>
Connection Options DBQ='<FOUND IN YOUR SPD-SERVER CONFIGURATION>’ HOST='<SERVER>’ SERV='<PORT>’
E.g.
DBQ='<FOUND IN YOUR SPD-SERVER CONFIGURATION>’ HOST=’SPDSERVER01′ SERV=’5180′

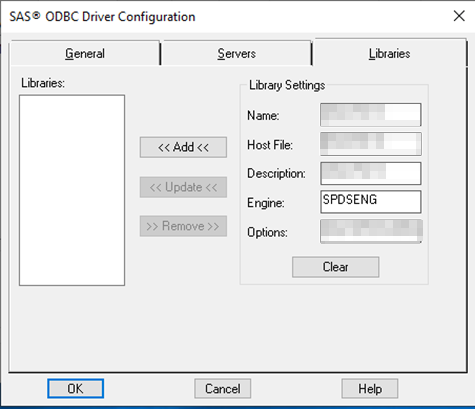
On the Libraries-tab

Name <NAME OF THE LIBNAME ON THE SPD-SERVER TO BE ACCESSED>
Hostfile <NAME OF THE LIBNAME ON THE SPD-SERVER TO BE ACCESSED>
Description <DESCRIPTION>
Engine SPDSENG
Options DBQ='<FOUND IN YOUR SPD-SERVER CONFIGURATION>’

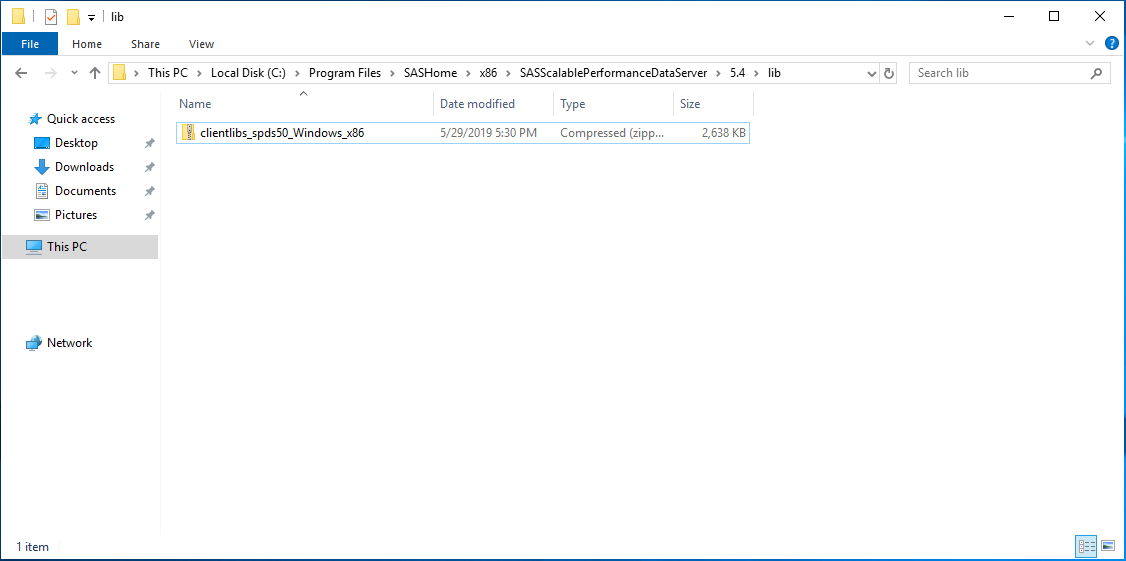
If you want to install the 32-bit version of the ODBC-driver after the installation of the 64-bit version of the ODBC-driver.
Then be aware, that the 32-bit version of the ODBC-driver is installed in this folder, if the default installation path is chosen for the 64-bit version of the ODBC-driver: C:\Program Files\SASHome\x86\SASScalablePerformanceDataServer\5.4\lib

If you do not have a tool to test a ODBC-connection available on the machine for the installation. It is possible to test these through PowerShell.

This is possible using the PowerShell code below.

$conn = new-object System.Data.Odbc.OdbcConnection
$conn.connectionstring = "DSN=<NAME OF YOUR ODBC-CONNECTION>; UID=<USERID>; PWD=<USER PASSWORD>"
$conn.open()
$sql = "SELECT * FROM <TABLE IN LIBNAME ON SPD-SERVER>";
$cmd = New-Object System.Data.Odbc.OdbcCommand($sql, $conn);
$rdr = $cmd.ExecuteReader()
$rdr.read()
$rdr.GetValue(0)
$conn.Close();
Installing and configuring an SAS OLEDB-driver for MSSQL

To get the correct SAS OLEDB driver or newest SAS OLEDB driver. It is best to do a search e.g. on Google.
NB! You need an account at SAS to be able to download.

And even thou this guide for Installing and configuring an SAS OLEDB-driver for MSSQL is old – it is still very useful.

Be aware, that it is possible to code a program in e.g. .NET that reads a SAS-dataset. It can be done with the SasReader (currently in version 1.0.6).

Below code in C# reads a SAS-dataset and outputs it into a .CSV-file.
Credits to my colleague that figured this out.

using System;
using System.IO;
using SasReader;
using System.Text;

namespace SasToCsvConverter
{
    class Program
    {
        static void Main(string[] args)
        {
           // Define paths
           // string sasFilePath = @"C:\temp\<YOUR SAS-DATASET>.sas7bdat";
           // string csvFilePath = @"C:\temp\output.csv";
            try
            {
                // Initialize SAS file reader
                using (FileStream sasToParseFileInputStream = File.OpenRead(sasFilePath))
                {
                    SasFileReader sasFileReader = new SasFileReaderImpl(sasToParseFileInputStream);

                    // Open the CSV file for writing
                    using (var writer = new StreamWriter(csvFilePath, false, Encoding.UTF8))
                    {
                        // Read and write META DATA
                        var sasMetaColumns = sasFileReader.getColumns();

                        // Write header
                        var headerNames = new StringBuilder();
                        foreach (var column in sasMetaColumns)
                        {
                            headerNames.Append(column.getName()).Append(",");
                        }

                        // Remove the trailing comma
                        writer.WriteLine(headerNames.ToString().TrimEnd(','));

                        // Write DATA
                        long rowCount = sasFileReader.getSasFileProperties().getRowCount();
                        for (int i = 0; i < rowCount; i++)
                        {
                            var row = sasFileReader.readNext(); // object[]
                            var rowValues = new StringBuilder();
                            foreach (var value in row)
                            {
                                var stringValue = value?.ToString() ?? string.Empty;
                                rowValues.Append(EscapeCsvValue(stringValue)).Append(",");
                            }

                            // Remove the trailing comma
                            writer.WriteLine(rowValues.ToString().TrimEnd(','));

                            // Optional: Log progress
                            Console.WriteLine($"Processed row {i + 1}/{rowCount}");
                        }
                    }
                }

                Console.WriteLine("Conversion to CSV completed successfully.");
            }

            catch (Exception ex)
            {
                Console.WriteLine($"An error occurred: {ex.Message}");
            }
        }

        private static string EscapeCsvValue(string value)
        {
            if (value.Contains(",") || value.Contains("\"") || value.Contains("\n"))
            {
                return $"\"{value.Replace("\"", "\"\"")}\"";
            }
            return value;
        }
    }
}

SAS libname for Oracle

Below SAS-code shows how to make a libname for Oracle directly in SAS-code by providing information about the Oracle server, that you want to access.

libname <YOUR CHOICE> oracle user=<USERNAME> pw=<PASSWORD> Schema=<SCHEMA ON ORACLE>
path="(DESCRIPTION =
(ADDRESS = (PROTOCOL = TCP)(HOST = <NAME/IP-ADRESSE OF ORACLE SERVER)(PORT = <PORT FOR ORACLE SERVER. DEFAULT ORACLE PORT IS 1539))
(CONNECT_DATA =
(SERVER = DEDICATED)
(SERVICE_NAME = <DATABASE ON ORACLE SERVER>))
)";

Scanning all SAS-programs on server

The commands below will scan all *.sas files and look for the text proc. It will of course be possible to use any other string instead of proc. This scenario can be used to scan all your SAS-programs for the usage of SAS-procedures. Be aware that you need to be administrator or run the command as administrator to have access to all folders.

Linux
It will scan from the root of a server and go recursively through all the subfolders it encounters. It will pipe the result of the scan to the file linuxsasproc.txt in the folder where you start the execution of the command – this can of course be changed if you want to.

grep --include=\*.sas -rinw '/' -e 'proc' > linuxsasproc.txt

NB! The –include has two – -.

Output in linuxsasproc.txt. The file is delimited by : (colon)
<Location of SAS-program containing the search string>:<Line number in the file where the search string is found>:<The line that includes the search string>

Example
/sas/sasprogram.sas:24:proc sql;

Addition
In Linux I found that the command find has a maxdepth-option. This option makes it possible to decide, how far down a folder hierarchy a search should be preformed.
For example -maxdepth 1 will not search subfolders. This means that the command below will only search for files (-type f) in all folders matching  the folders with wildcard ./sasjobs/runningtime_*/ – but not subfolders of these folders.

find ./sasjobs/runningtime_*/ -maxdepth 1 -type f > result.txt

Windows
It will scan through all subfolder from the location where you start the program. It will pipe the result of the scan to the file winsasproc.txt in the folder where you start the execution of the command – this can of course be changed if you want to.

findstr /s /i proc *.sas > winsasproc.txt

NB! Be aware, that the DOS-commando findstr has an ‘Out of Memory‘ flaw.
Therefore, it can be better to use PowerShell, if this is available for you. The PowerShell command can look something like the below

Get-ChildItem -Path <PATH TO SCAN>:\*.sas -Recurse | Select-String -Pattern 'PROC' | Out-File "<FILE TO CONTAIN OUTPUT>"

An example below

Get-ChildItem -Path C:\*.sas -Recurse | Select-String -Pattern 'PROC' | Out-File "C:\output\sasscanoutput.csv"

Output in winssasproc.txt. The file is delimited by : (colon)
<Location of SAS-program containing the search string>:<The line that includes the search string>

Example
Documents\sasprogram.sas:proc sql;

Get CSV-file from SAS to Excel PowerPivot

To get the correct formatting of a CSV-file from SAS to import into Excel PowerPivot, it’s possible to use the CSV ODS-tagset (https://documentation.sas.com/?docsetId=odsug&docsetTarget=n0jrwo0xyh8nlqn19u6uvrgx63gc.htm&docsetVersion=9.4&locale=en) and do a PROC PRINT of the dataset into an CSV-file.

ods csv file="ODS_CSV.csv";
   proc print data=sashelp.class;
   run;
ods csv close;

I have found that this will do the correct formatting of text in “ “.

Using MSSQL TEMPDB in SAS

You can use the TEMPDB in Microsoft SQL-server through SAS by creating a ODBC-libname – like the libname below.

libname TMPLIB ODBC NOPROMPT="DRIVER=SQL Server; SERVER=<SERVERNAME>; DATABASE=TEMPDB; TRUSTED_CONNECTION=yes" schema=DBO CONNECTION=SHARED;

It’s important to provide the option CONNECTION=SHARED or else it will not work.

Through the libname it’s now possible to write and read from TEMPDB. The dataset has to have this syntax ‘#<DATASETNAME>’n e.g. like below ‘#temp’n

data tmplib.'#temp'n;
set sashelp.class;
run;

Be aware, that you are not able to view this new table through the Display Manager in SAS. When Microsoft SQL-server names the table, it makes the table name longer than SAS is able to display in the Display Manager.
You’re able to verify that the table do exist through SSMS (SQL Server Management Studio), or you can verify it’s existence by reading it back to SAS by using the code below.

proc sql;
create table temp as
select *
from tmplib.'#temp'n
;
quit;

If you want to use MSSQL-server temp-tables in Pass-Through SQL in SAS, then you need to use the libname option dbmstemp=yes.
Using this option will make it possible to execute the code below and force SAS to use the MSSQL-server to process the SQL-code in the pass-through SQL. If the option dbmstemp=yes is not used, then SAS will pull the data from the MSSQL-server back to be executed locally on the SAS-installation. It works with the below driver.

libname tmplib odbc noprompt="driver=odbc driver 11 for sql server; server=<servername>; database=tempdb; trusted_connection=yes" schema=dbo connection=shared dbmstemp=yes;

data tmplib.<SASTEMP-tablename>;
set <tablename>;
run;

proc sql noprint;
connect to odbc (noprompt="driver=odbc driver 11 for sql server; server=<servername>; trusted_connection=yes");
create table <tablename> as
select * from connection to odbc
(
select a.*
from <tablename> a
inner join tempdb.##<SASTEMP-tablename> b on a.<variable> = b.<variable>
);
disconnect from odbc;
quit;

Further information can be found in this link: http://support.sas.com/documentation/cdl/en/acreldb/63647/HTML/
default/viewer.htm#a002677192.htm


Extending the Display Manager in SAS

The commands below can be used to expand the Display Manager in SAS.

Command Description
vt &syslast.; Add to keys, e.g. F5. This opens a Viewtable with the latest run dataset/view.
next viewtable:; end; Add to keys, e.g. F9. Then F9 closes the last used table (that is open). Can close all views with multiple F9’s.
odsresults; select all; clear; wpgm; Add to keys, e.g. SHIFT F1. This key bind clears all SAS “results” and returns to the program editor.
log; clear; wpgm; Add to keys, e.g. F4. Clears log without having to highlight the log window. Returns to the program editor.


SAS “behind the scenes”

Below is a description of very useful options in SAS, if you want a look “behind the scenes” and see what SAS actually does when processing data.

options fullstimer sastrace=(,,,d) sastraceloc=saslog mprint source2 nostsuffix;
fullstimer The SAS System provides the FULLSTIMER option to collect performance statistics on each SAS step, and for the job as a whole and place them in the SAS log. It is important to note that the FULLSTIMER measures only give you a snapshot view of performance at the step and job level.
sastrace=(,,,d) Generates trace information from a DBMS engine.

‘,,,d’ specifies that all SQL statements that are sent to the DBMS are sent to the log. Here are the applicable statements:
SELECT
DELETE
CREATE
SYSTEM
CATALOG
DROP
COMMIT
INSERT
ROLLBACK
UPDATE
For engines that do not generate SQL statements, API calls and all parameters are sent to the log.

sastraceloc=saslog Prints SASTRACE information to a specified location.
In this case the log in SAS.
mprint Specifies whether SAS statements generated by macro execution are traced for debugging.
source2 Specifies whether SAS writes secondary source statements from included files to the SAS log.

SOURCE2 specifies to write to the SAS log secondary source statements from files that have been included by %INCLUDE statements.

nostsuffix The NOSTSUFFIX system option suppresses printing or display of trailing SASTRACE information and makes the SASTRACE log easier to read.