Installing and configuring an DB2 ODBC CLI-driver on Windows

An DB2 CLI-driver is a self-sufficient driver that supports a subset of the functions that are provided by the DB2 ODBC-driver.

First download the DB2 ODBC CLI-driver from IBM’s homepage. As such you don’t need to install the driver. You just need to copy it to the location where you want it to reside.
In the below example the directory for the driver is: C:\Software\DB2_ODBC\
The file downloaded from the IBM-homepage is then unpacked into the directory v10.5fp11_nt32_odbc_cli

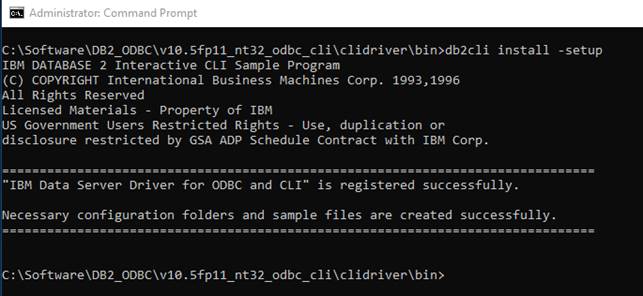
When the driver is unpacked go to the directory bin. In this directory you need to execute the command db2cli install -setup. This installs/makes the driver visible inside ODBC Data Sources in Windows.

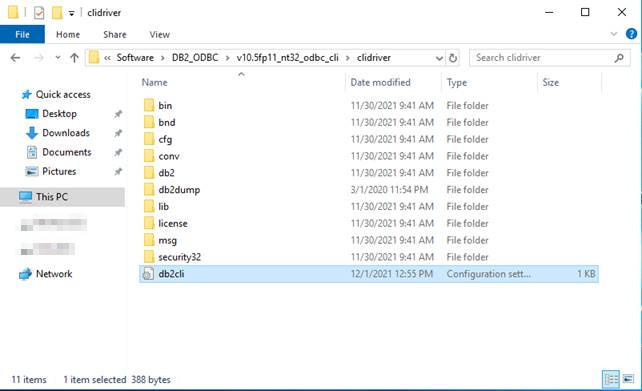
Now you need to create or copy an existing db2cli.ini file to the directory (in this example): C:\Software\DB2_ODBC\v10.5fp11_nt32_odbc_cli\clidriver

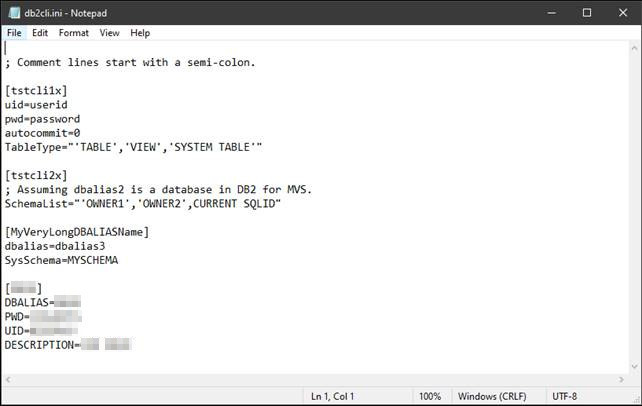
Below is an example of what the contents of an db2cli.ini file could be. The db2cli.ini file is “just” a file containing meta-information about the alias that you want to use for you driver inside ODBC Data Sources in Windows.

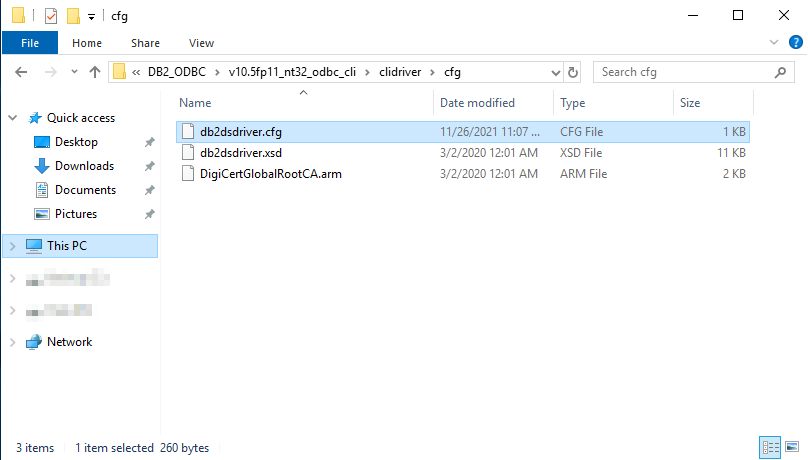
Now you need to create or copy an existing file db2dsdriver.cfg. This file is to be placed in the directory (in this example): C:\Software\DB2_ODBC\v10.5fp11_nt32_odbc_cli\clidriver\cfg

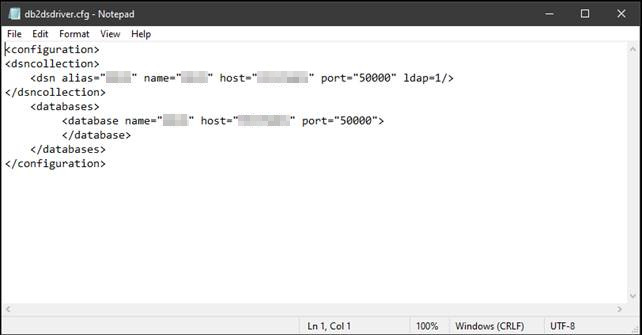
Below is an example of what the contents of an db2dsdriver.cfg file could be. The db2dsdriver.cfg file contains the more technical information about the alias that you created in the db2cli.ini file. Therefore, the alias in this file must correspond to an alias in the db2cli.ini file. Pointing the alias in the db2cli.ini file to a server and database.

NB! The port number (port=”50000”) in the example below doesn’t have to be the port number used on your system. This is just the default port number for an DB2-instance.
Installing a terminal server on Microsoft Windows Server

The below blog post will show you how to install make a Microsoft Windows Server a Terminal Server. This was done on a Microsoft Windows Server 2019 Datacenter.

A Terminal Server makes it possible for multiple users to access a Windows Server through Remote Desktop (also called RDP). A normal Windows Server installation is limited to two (2) multiple users.

First off you need to get Terminal Services installed on the Windows Server if this is not already installed.

1.
To do this you need to start Windows PowerShell as an administrator and execute the command below.

Command: Install-WindowsFeature RDS-RD-Server -IncludeManagementTools

2.
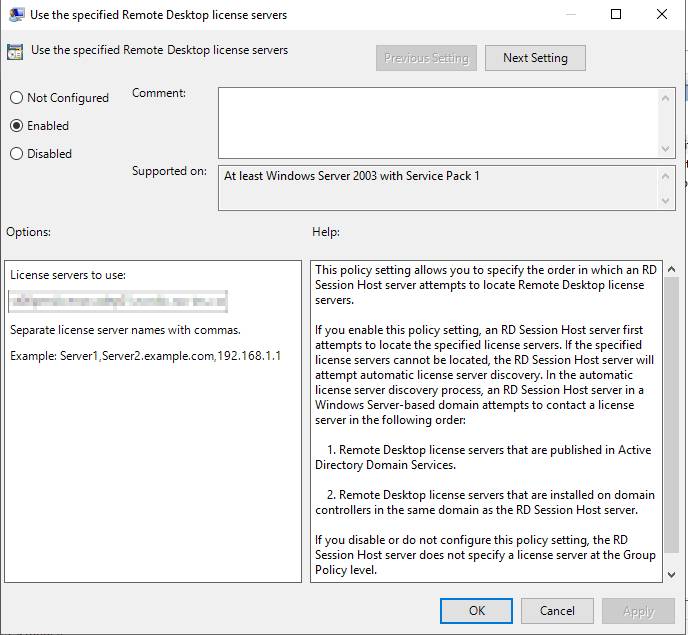
Then you need to set the license server under in the Local Group Policy Editor. This is done from the Edit Group Policy located in the Control Panel.

Go to Computer Configuration\Administrative Templates\Windows Components\Remote Desktop Services\Remote Desktop Session Host\Licensing

And choose Use the specified Remote Desktop license servers to set the server.

Here you need to insert the license server provided.

3.
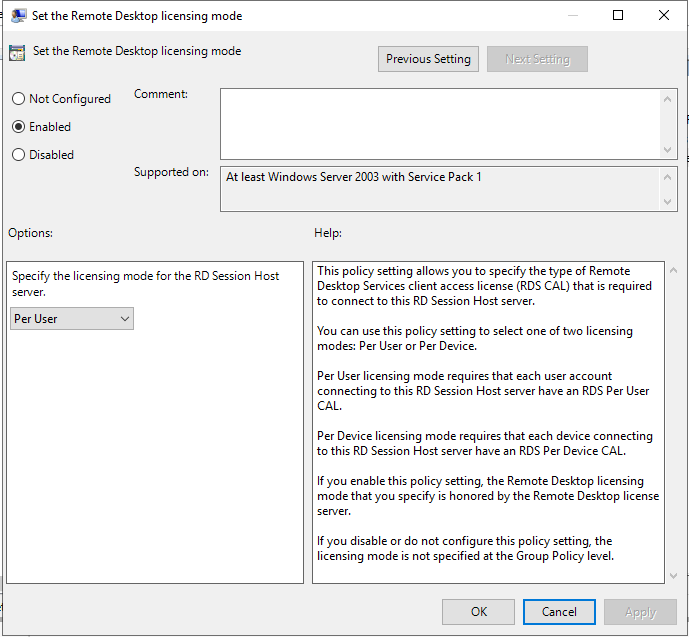
Then you need to set the license mode under in the Local Group Policy Editor. This is done from the Edit Group Policy located in the Control Panel.

Go to Computer Configuration\Administrative Templates\Windows Components\Remote Desktop Services\Remote Desktop Session Host\Licensing

And choose Set the Remote Desktop licensing mode

Here you most likely want to choose Per User

SAS libname for Oracle

Below SAS-code shows how to make a libname for Oracle directly in SAS-code by providing information about the Oracle server, that you want to access.

libname <YOUR CHOICE> oracle user=<USERNAME> pw=<PASSWORD> Schema=<SCHEMA ON ORACLE>
path="(DESCRIPTION =
(ADDRESS = (PROTOCOL = TCP)(HOST = <NAME/IP-ADRESSE OF ORACLE SERVER)(PORT = <PORT FOR ORACLE SERVER. DEFAULT ORACLE PORT IS 1539))
(CONNECT_DATA =
(SERVER = DEDICATED)
(SERVICE_NAME = <DATABASE ON ORACLE SERVER>))
)";

Scanning all SAS-programs on server

The commands below will scan all *.sas files and look for the text proc. It will of course be possible to use any other string instead of proc. This scenario can be used to scan all your SAS-programs for the usage of SAS-procedures. Be aware that you need to be administrator or run the command as administrator to have access to all folders.

Linux
It will scan from the root of a server and go recursively through all the subfolders it encounters. It will pipe the result of the scan to the file linuxsasproc.txt in the folder where you start the execution of the command – this can of course be changed if you want to.

grep --include=\*.sas -rinw '/' -e 'proc' > linuxsasproc.txt

NB! The –include has two – -.

Output in linuxsasproc.txt. The file is delimited by : (colon)
<Location of SAS-program containing the search string>:<Line number in the file where the search string is found>:<The line that includes the search string>

Example
/sas/sasprogram.sas:24:proc sql;

Addition
In Linux I found that the command find has a maxdepth-option. This option makes it possible to decide, how far down a folder hierarchy a search should be preformed.
For example -maxdepth 1 will not search subfolders. This means that the command below will only search for files (-type f) in all folders matching  the folders with wildcard ./sasjobs/runningtime_*/ – but not subfolders of these folders.

find ./sasjobs/runningtime_*/ -maxdepth 1 -type f > result.txt

Windows
It will scan through all subfolder from the location where you start the program. It will pipe the result of the scan to the file winsasproc.txt in the folder where you start the execution of the command – this can of course be changed if you want to.

findstr /s /i proc *.sas > winsasproc.txt

NB! Be aware, that the DOS-commando findstr has an ‘Out of Memory‘ flaw.
Therefore, it can be better to use PowerShell, if this is available for you. The PowerShell command can look something like the below

Get-ChildItem -Path <PATH TO SCAN>:\*.sas -Recurse | Select-String -Pattern 'PROC' | Out-File "<FILE TO CONTAIN OUTPUT>"

An example below

Get-ChildItem -Path C:\*.sas -Recurse | Select-String -Pattern 'PROC' | Out-File "C:\output\sasscanoutput.csv"

Output in winssasproc.txt. The file is delimited by : (colon)
<Location of SAS-program containing the search string>:<The line that includes the search string>

Example
Documents\sasprogram.sas:proc sql;

Using TNSPING to get info about Oracle server

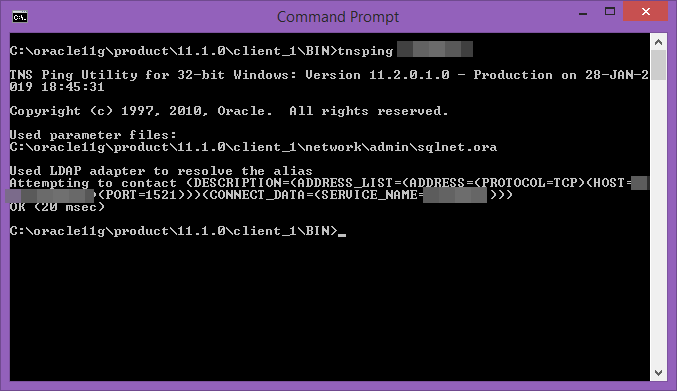
The command TNSPING can be used to get information about an alias for an Oracle server. Below you can see a screenshot from the command being executed in the command prompt for Windows.

In the command prompt you write: tnsping <the alias of your Oracle server>

TNSPING will return the

HOST Showing you the name of the physical host of the Oracle server.
PORT Showing you the port of the Oracle server on the physical host.
1521 is the default port for an Oracle server.

Get CSV-file from SAS to Excel PowerPivot

To get the correct formatting of a CSV-file from SAS to import into Excel PowerPivot, it’s possible to use the CSV ODS-tagset (https://documentation.sas.com/?docsetId=odsug&docsetTarget=n0jrwo0xyh8nlqn19u6uvrgx63gc.htm&docsetVersion=9.4&locale=en) and do a PROC PRINT of the dataset into an CSV-file.

ods csv file="ODS_CSV.csv";
   proc print data=sashelp.class;
   run;
ods csv close;

I have found that this will do the correct formatting of text in “ “.

Using MSSQL TEMPDB in SAS

You can use the TEMPDB in Microsoft SQL-server through SAS by creating a ODBC-libname – like the libname below.

libname TMPLIB ODBC NOPROMPT="DRIVER=SQL Server; SERVER=<SERVERNAME>; DATABASE=TEMPDB; TRUSTED_CONNECTION=yes" schema=DBO CONNECTION=SHARED;

It’s important to provide the option CONNECTION=SHARED or else it will not work.

Through the libname it’s now possible to write and read from TEMPDB. The dataset has to have this syntax ‘#<DATASETNAME>’n e.g. like below ‘#temp’n

data tmplib.'#temp'n;
set sashelp.class;
run;

Be aware, that you are not able to view this new table through the Display Manager in SAS. When Microsoft SQL-server names the table, it makes the table name longer than SAS is able to display in the Display Manager.
You’re able to verify that the table do exist through SSMS (SQL Server Management Studio), or you can verify it’s existence by reading it back to SAS by using the code below.

proc sql;
create table temp as
select *
from tmplib.'#temp'n
;
quit;

If you want to use MSSQL-server temp-tables in Pass-Through SQL in SAS, then you need to use the libname option dbmstemp=yes.
Using this option will make it possible to execute the code below and force SAS to use the MSSQL-server to process the SQL-code in the pass-through SQL. If the option dbmstemp=yes is not used, then SAS will pull the data from the MSSQL-server back to be executed locally on the SAS-installation. It works with the below driver.

libname tmplib odbc noprompt="driver=odbc driver 11 for sql server; server=<servername>; database=tempdb; trusted_connection=yes" schema=dbo connection=shared dbmstemp=yes;

data tmplib.<SASTEMP-tablename>;
set <tablename>;
run;

proc sql noprint;
connect to odbc (noprompt="driver=odbc driver 11 for sql server; server=<servername>; trusted_connection=yes");
create table <tablename> as
select * from connection to odbc
(
select a.*
from <tablename> a
inner join tempdb.##<SASTEMP-tablename> b on a.<variable> = b.<variable>
);
disconnect from odbc;
quit;

Further information can be found in this link: http://support.sas.com/documentation/cdl/en/acreldb/63647/HTML/
default/viewer.htm#a002677192.htm